A small greenhouse works best when its layout supports the jobs you actually do. Filling every wall with staging can leave no room for mature crops, while planting every available floor area can make watering and ventilation awkward. Start with access, light and the growing system you can maintain, then fit benches and plants around those needs. The most productive arrangement is often flexible, changing from spring propagation to summer cropping and winter shelter.
This guide focuses on practical layout decisions for a modest UK greenhouse. It distinguishes unheated protection from controlled heating, explains paths and ventilation, and shows how to allocate staging, tall crops and watering space. There is no single ideal diagram for every structure. Door position, roof height, orientation, external shade and the crops you grow all affect what will work, so use measurements and seasonal observations rather than copying an attractive photograph without checking its assumptions.
Measure the usable space
Measure internal floor width and length rather than relying on the greenhouse's advertised external dimensions. Note the door opening, threshold, roof supports, low eaves and any inward-opening vents. Include areas where you cannot comfortably stand or reach. A sloping side may allow a bench but not a tall tomato plant. Record the position of safe water access and any professionally installed electrical supply, keeping these details visible on the plan.
Sketch the footprint on paper and add the path before drawing beds or staging. Measure the widest tray, watering can or mobility aid you need to carry through the door and along the route. Leave turning and working space where necessary. The correct path width depends on the user and tasks; a narrow gap that someone can squeeze through sideways is not automatically adequate for routine safe gardening.
Mock up proposed benches with empty trays or temporary markers on the floor. Walk through while carrying the equipment you normally use. Test whether you can reach the rear of the staging without leaning over fragile plants or supporting your weight on glazing. Open the door and vents fully. This simple rehearsal reveals practical conflicts before you buy furniture or fill beds that will be much harder to move later.
Choose your main greenhouse purpose
A structure used mainly for spring seedlings needs different space from one devoted to tall summer tomatoes. An overwintering collection may require floor space long before autumn arrives. List your main uses by season and choose priorities. If propagation and mature crops overlap, decide where seedlings will move as the fruiting plants grow. Without that handover plan, the same bench can be promised to several groups of plants at once.
An unheated greenhouse shelters plants from some weather and can warm considerably in sunshine, but it does not guarantee frost-free nights. Record actual minimum temperatures and select plants accordingly. A heated propagator warms its own small environment; it does not necessarily make the rest of the greenhouse suitable for tender seedlings after they emerge. Plan the follow-on location before sowing, including light, night temperature and room for potting on.
A heated greenhouse needs a defined temperature goal and a suitable safe system. Heating costs and energy use depend on the structure, insulation, weather and target conditions. Do not purchase heat-loving plants first and discover the requirement afterwards. Use equipment intended for greenhouse conditions and follow installation and clearance instructions. Where electrical work is required, use an appropriately qualified professional rather than extending ordinary indoor arrangements into a wet growing space.
Put safe access at the centre
The path should remain firm, stable and free from trip hazards. Avoid loose hoses across the entrance, trailing cables, stacked pots and low projecting supports. Consider how wet footwear, algae or spilled compost affect grip. Clean spills promptly and maintain drainage. A greenhouse floor does not need to look decorative to work well, but it must allow safe movement while carrying water or a tray with both hands occupied.
Keep the door usable throughout the season. A large pot placed beside the entrance may later produce foliage that obstructs movement or catches clothing. Allow for mature plants, hanging fruit and support strings. Avoid overhead arrangements that force you to duck while holding tools. If children or visitors use the space, check eye-level cane ends, sharp fixings and access to stored products. Layout should reduce foreseeable daily hazards rather than relying on constant careful squeezing.
Do not use the greenhouse as a general store for every unused garden item. Keep only the tools and materials needed regularly, in a defined dry secure area appropriate to them. Store products in original labelled packaging and according to their instructions. Heavy items should sit on suitable stable surfaces rather than high shelves. The ability to remove a tray or reach a vent without moving a stack of equipment saves time every day.
Protect ventilation routes
Ventilation is a layout requirement, not an accessory considered after planting. Greenhouses can overheat from spring into autumn, and roof vents, side openings and doors need unobstructed access and operation. Do not place tall staging directly against a vent mechanism or grow dense foliage across an opening. Check airflow at the level of the crop as well as the roof. A door that opens widely is useful only if the path to it remains clear.
Automatic vent openers can help, but they still need checking and cannot compensate for an inadequate arrangement. Test their operation and ensure plants or shading cannot block the movement. In changeable weather, additional ventilation may be needed before an opener fully responds. Monitor conditions with a suitable thermometer and observe plant response. A single pleasant reading near the door does not describe the hottest still corner behind a dense crop.
Shading may be useful during intense sunshine, but it reduces incoming light and should match the crops and conditions. Use a manageable system that can be adjusted or removed when unnecessary. Do not permanently darken the greenhouse as a substitute for ventilation. Consider where the material is installed, how it affects vent operation and whether it can be maintained safely. A small greenhouse needs enough light for growth as well as protection from damaging heat.
Arrange staging around light and reach
Staging is valuable for seed trays and small plants because it provides working height and keeps them accessible. Choose a stable structure rated for its load, including wet compost and trays. Slatted surfaces can help drainage and air movement where appropriate. A lower shelf may be useful for empty pots but unsuitable for seedlings if the upper bench blocks light. Evaluate light at the actual leaf level rather than assuming every shelf is growing space.
Keep bench depth within a comfortable reach. If you cannot reach the rear without leaning on the frame or moving several plants, reduce depth or change access. Removable sections can provide flexibility for summer cropping, but store removed parts safely. Avoid improvising heavy shelves against glazing or unsupported frame members. Follow the greenhouse manufacturer's guidance for fixings and loads, and keep structures independent where the frame is not designed to support them.
A small propagation zone should include room for labels, watering and inspection rather than trays packed edge to edge. Allow seedlings to grow without immediately creating an overcrowded canopy. Space expands rapidly after potting on, so calculate the number of larger pots you can hold. A tray containing dozens of seedlings may become an entire bench of young plants. Keeping only the useful number prevents a bottleneck that later compromises the main crop.
Place tall crops for height, light and support
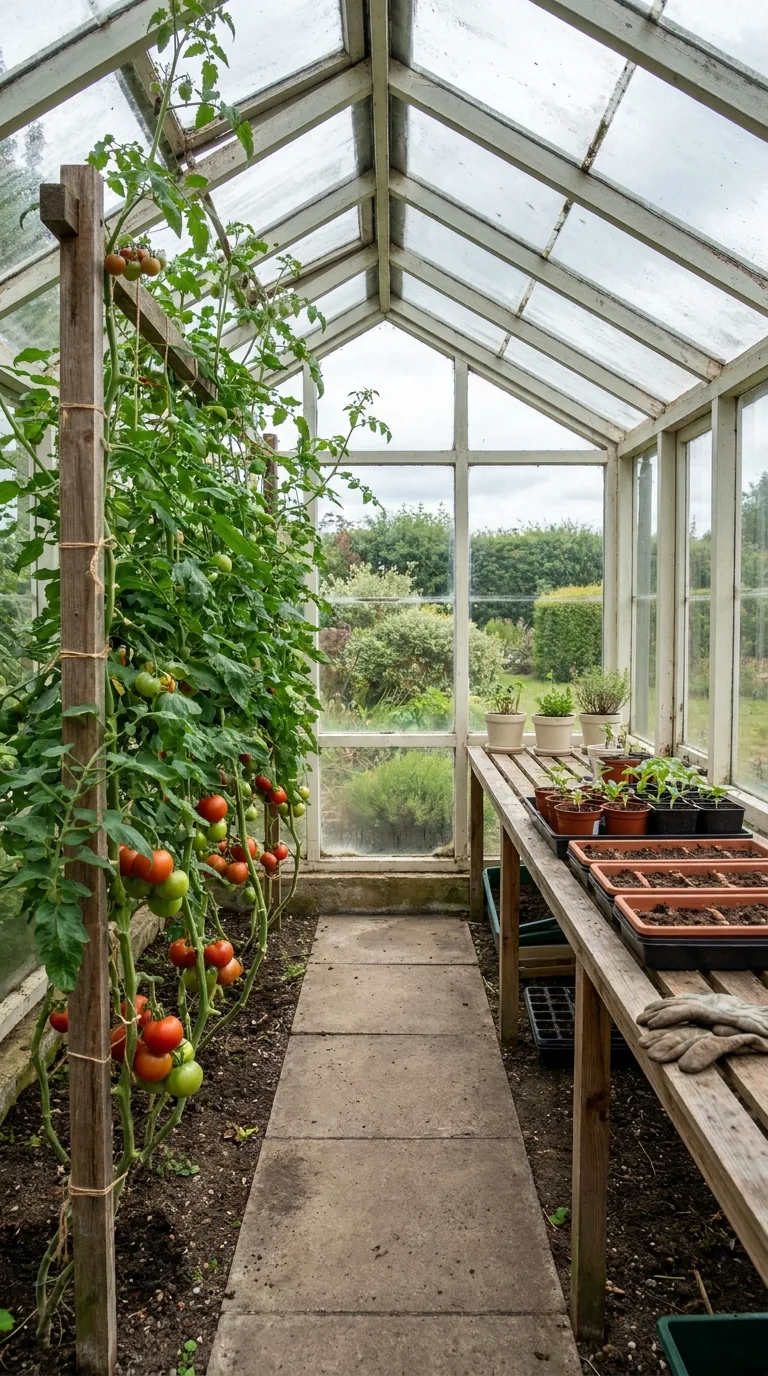
Tomatoes, cucumbers and other climbing or tall crops need a position that suits their mature form. Check headroom under the roof and how foliage will shade neighbouring plants. The best side depends on the structure's orientation and outside shade, so observe the actual light before choosing. Do not assume a compass rule alone solves every layout. A hedge, wall or neighbouring building may matter more than the nominal orientation.
Supports must be safe and appropriate to the growing system. String supports need secure permitted anchor points, while canes and frames need a stable base. Do not hang substantial crop weight from a glazing bar or fitting that is not designed for it. Plan ties, access for pruning and room to inspect leaves. A crop whose support is adequate at planting can become heavily loaded as foliage and fruit develop.
Ground beds and containers have different maintenance implications. Beds require suitable soil and disease management, while pots and growing bags need close water and nutrient attention. Choose the system you can sustain, with access to every root zone. Do not hide containers behind a bench where watering and drainage checks become difficult. Keep enough room around plants that foliage does not remain an impenetrable wall along the path.
Make water access convenient and controlled
Position water equipment so it supports safe movement. A hose should reach intended crops without pulling across fragile plants or creating a trip line at the entrance. A watering can must fit beneath the supply point and be manageable when filled. If using irrigation, plan tubing routes and secure them appropriately. Leave emitters visible enough to inspect, because a blocked outlet can dry one plant while the rest of the system appears to work.
Test irrigation with the actual containers and growing medium before relying on it during an absence. Check representative wet and dry positions, drainage and plant response. A timer measures duration, not the moisture in every root ball. Keep a manual inspection routine and arrange a clear backup plan. Avoid placing reservoirs or heavy water storage on staging that is not rated for the load, and keep storage secure.
Group crops with compatible water needs when practical, but still inspect individually. A large fruiting plant can use much more water than a newly potted seedling beside it. Drainage must remain free and water should not collect around electrical equipment. Clean algae and standing debris from working areas. The layout should make a moisture check simple enough that you do it routinely, rather than requiring you to dismantle a dense arrangement of pots.
Change the layout through the year
In spring, use staging for seed trays and provide a clear progression to larger pots. Reserve space for tender plants awaiting suitable outdoor conditions. In summer, remove or reposition appropriate staging sections to make room for mature greenhouse crops, preserving ventilation and access. Do not leave propagation trays trapped under a dense tomato canopy. Give them a suitable alternative or reduce new sowings until adequate light and care are available.
In autumn, clear finished crops appropriately and inspect for pests and disease before introducing overwintering plants. Clean suitable surfaces and glazing carefully, following the structure's maintenance guidance. Check seals, vents and fixings before winter weather. In winter, group plants according to actual temperature needs. Insulation may conserve heat but can reduce light and affect ventilation, so use it deliberately rather than wrapping every surface without considering the crop.
A functional example for a small footprint
One workable arrangement is a clear central access route, a modest removable bench along one side and a summer crop area on the other. The back remains accessible for a limited number of taller plants only if there is sufficient height and airflow. Keep a small working area near the entrance for labels and short tasks, without obstructing the door. Exact dimensions must be checked against the greenhouse and the person using it.
During spring, the bench carries a manageable number of trays while the crop area holds plants waiting to be potted on. As summer crops establish, move suitable outdoor plants out after appropriate acclimatisation and reduce indoor clutter. In autumn, reverse the transition carefully. If your wider plan also includes outdoor beds, the raised vegetable bed guide helps organise growing areas that can receive plants from the greenhouse at the right stage.
Review the layout after a busy watering session rather than only when the greenhouse is empty and tidy. Note where you could not reach, where plants overheated or where water collected. Change one practical problem at a time and keep the path, ventilation and support structure as priorities. A successful small greenhouse remains usable as plants mature, giving each crop enough light and care while allowing you to work comfortably through the changing seasons.