Starting a vegetable garden from scratch is easier when the first season has a clear, limited purpose. You do not need to supply every meal or build an elaborate plot before sowing anything. A small accessible bed with crops you enjoy eating can teach you far more than a large area that becomes difficult to water and weed. Begin with the conditions you have, decide what you can maintain and let useful experience shape later expansion.
For a UK beginner, the main decisions are where to grow, what the soil needs and which crops fit the space and season. Buying seed is only one part of the project. Access, water, crop protection and time are equally important. This guide follows a practical first-season sequence, with a realistic budget framework and a maintenance plan that can adapt to your region, available space and changing weather.
Choose a location you can actually use
Observe possible sites at different times of day rather than choosing solely from one sunny photograph. Many vegetables benefit from an open sunny position, especially crops grown for fruits, but nearby buildings and trees can cast moving shade. Mark the brightest usable ground and notice where water stands after rain. A location close to the house may receive more regular attention than a larger attractive patch at the far end of the garden.
Check water access before marking beds. Carry a partly filled watering can along the route and consider doing it repeatedly during a warm week. Note awkward steps, gates and hoses that would cross paths. The best bed position balances light with realistic care. If a convenient location offers somewhat less sunshine, suitable leafy crops may be a better choice than demanding fruiting plants in a spot you struggle to reach.
Look for wind exposure and frost pockets. A sheltered corner can help young plants, but dense fencing or walls may also create shade and dryness. Do not crowd beds against established tree roots and assume compost will remove competition. If the land has an uncertain history, consider possible contamination before growing food. Ask the relevant landowner or local authority about known risks and use appropriate assessment rather than guessing from the soil's appearance.
Start with a small, reachable area
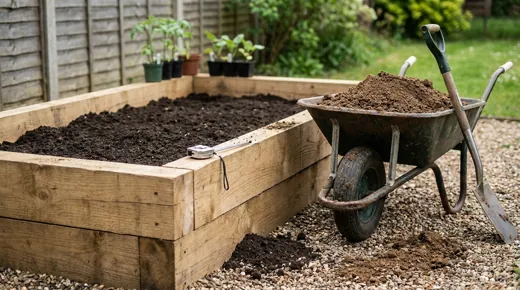
Mark the proposed bed with string or a hose before doing construction. Stand beside it and test whether you can comfortably reach the middle without stepping on the soil. The suitable width depends on your reach, whether access is available from one or both sides and any mobility needs. Keep enough room around the bed for the tools or assistance you use. A narrow awkward route can turn simple harvesting into a frustrating task.
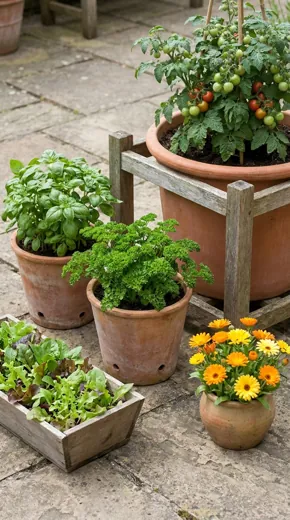
One modest bed or a few well-chosen containers can be enough for a first season. Expansion can follow once you understand watering demand and crop performance. Avoid preparing a large area merely because space exists. Unused cultivated ground quickly becomes another weeding job. If you inherit a bigger plot, establish one manageable section while keeping the remaining area under suitable control or cover rather than attempting everything at once.
Raised beds are useful in some situations, particularly for access or managing a defined growing area, but they are not compulsory. Existing suitable soil can grow vegetables without purchased frames. A raised bed still needs appropriate fill, drainage and paths, and the material cost can exceed the seed budget by a wide margin. Decide whether the structure solves a real problem before treating it as the starting requirement for every garden.
Evaluate the soil before adding products
Take a small sample from the proposed rooting area and inspect texture, moisture and debris. Heavy soil tends to behave differently from sandy soil, but both can support crops with suitable management. Look for compaction, persistent weeds and evidence of waterlogging. Avoid working wet soil that smears on tools or sticks heavily to boots. Waiting for workable conditions protects structure and can save the labour of repairing damage later.
Identify persistent weeds before cultivation. Chopping and redistributing their roots can make some problems worse. Remove them with a method appropriate to the species and site, following current label instructions if using a product. Keep suspect invasive material separate and follow disposal guidance. If you are unsure what a plant is, identify it before spreading fragments or moving soil around the garden. Care at this stage reduces recurring work throughout the season.
A soil pH test is useful when choosing crops or considering amendments such as lime. Do not apply lime simply because a general gardening list mentions it. The correct action depends on the existing pH, crop requirements and product instructions. Likewise, several different fertilisers are not an automatic improvement. Record additions so you understand what has already been applied and can respond to crop growth instead of treating every weakness with another feed.
Suitable well-rotted organic matter can improve soil condition over time. Use material from a reliable source and check that it does not bring persistent weeds or other problems. Apply according to the bed, crop and method you choose. A surface mulch and a cultivated incorporation are different approaches, each requiring sensible timing. Neither instantly corrects every drainage issue. Where water collects persistently, investigate the cause rather than repeatedly burying it beneath more material.
Choose first crops for meals and conditions
Make a list of vegetables you regularly eat, then narrow it to those suited to the available light, season and space. Easy-to-harvest leaves, suitable radish, beetroot, dwarf beans or a limited number of other familiar crops may fit a small beginning. There is no single universally easiest crop. A vegetable that thrives in one garden can struggle where its moisture, soil or temperature needs are not met.
Read mature spacing before calculating quantities. A tiny courgette seedling can grow into a substantial plant, and winter brassicas may occupy a bed for months. Crop names alone do not describe the commitment. Note whether a plant climbs, spreads, requires support or needs repeated picking. A small household may benefit more from modest continuous harvests than from a large single crop that arrives during a busy week away from home.
Choose named varieties intended for the conditions and season. A compact container tomato, a greenhouse cordon tomato and an outdoor bush variety are different planning choices. Check whether you will sow seed, plant sets or tubers, or buy healthy young plants. Buying a few suitable seedlings can reduce the need for indoor propagation equipment during the first year. That is a practical choice, especially if your windowsills offer limited light or room.
Build a simple seasonal sequence
For each chosen crop, record sowing, planting and likely harvest windows from reliable crop guidance and packet instructions. Adjust for your location and actual conditions rather than copying a southern calendar into an exposed northern plot. Separate protected sowing from outdoor sowing, and distinguish seed sowing from transplanting already-raised plants. These differences explain many apparent contradictions in beginner planting lists.
Use small successive sowings where appropriate. A short row of salad now and another later may be more useful than the whole packet sown at once. Leave room for summer crops that cannot yet go outdoors. If two crops are intended to use the same bed, check that the first is likely to finish before the second needs planting. Include some flexibility for slow growth or poor weather instead of assuming each date will be exact.
Do not let an early start become the goal in itself. Tender seedlings need light, warmth and increasing pot space until outdoor conditions are suitable. Starting them too soon can create weeks of difficult care. Healthy plants raised at an appropriate time often perform better than stressed oversized plants waiting on a crowded windowsill. Plan backwards from a realistic planting opportunity and the facilities you actually have.
Budget for useful categories
| Budget category | Likely first-season items | Way to control spending |
|---|---|---|
| Growing area | Bed preparation, optional edging or containers | Use suitable existing ground before building extra structures |
| Growing medium | Appropriate compost or soil improvement | Measure the required volume before ordering |
| Plants | A short list of seed, sets or healthy young plants | Choose useful quantities and avoid duplicate varieties |
| Basic care | Watering can, labels and necessary hand tools | Reuse clean sound equipment already available |
| Protection and support | Suitable mesh, stakes or crop supports | Buy for identified crops and pests rather than hypothetical needs |
Prices vary by supplier, location and materials, so make a local estimate for your actual plan rather than relying on a universal starter figure. Include delivery where bulky materials are involved. Reused containers can save money if they are safe, durable and suitable for food growing, with adequate drainage. Do not use a container with an unknown chemical history simply because it is free. Cheap equipment is useful only if it safely performs the required job.
Plant carefully and label everything
Prepare a small area well, then follow the crop's depth and spacing instructions. Water appropriately during establishment and avoid sowing tiny seed into large rough clods. Label rows at both ends if there is a risk of disturbance and record the date on your plan. Similar emerging plants are easy to confuse. Clear identification also prevents you from hoeing out a slow crop because it resembles the weeds beside it.
When planting young plants, inspect the root ball and avoid letting it dry before planting. Set the plant at the depth suitable for that crop and settle the surrounding soil gently. Check the plant later that day and again after changing weather. Newly planted roots need attention while they explore the bed. Mulch may help once conditions suit it, but keep material clear of stems and inspect underneath rather than assuming it replaces watering.
Keep maintenance short and regular
During active growth, walk the plot frequently and check moisture, pests, weeds and supports. The time needed varies with weather and crop choice, so avoid promising that a garden requires only one brief weekly visit. A warm windy spell can make containers much more demanding. Fit the routine to your actual availability and reduce the number of plants if regular care becomes difficult.
Weed while competitors are small and identifiable. Check netting for gaps and ensure it remains taut and safe for wildlife. Tie growing plants before they flop and inspect supports after wind. Identify pests before responding, tolerating minor damage where plants remain healthy. Record recurring problems so next year's variety choice, sowing timing or protection can improve. Good gardening is often a sequence of small corrections rather than one perfect initial setup.
Harvest promptly at the stage suited to the crop and your intended meal. Picking regularly can maintain quality and reveal whether your sowing quantities were sensible. Clear finished crops appropriately, taking account of disease risk, and leave the bed ready for its next purpose. Keep a record of what you actually ate. A large harvest that was never used is less helpful for planning than a smaller crop that reliably supplied useful food.
A first-season example and review
A beginner with one sunny bed might choose a few short salad rows, a manageable beetroot sowing and a small supported bean crop, leaving access around each. Someone with a patio might use fewer crops in suitable pots instead. The container vegetable growing guide explains how to match crops, pot size and watering where open ground is unavailable. Choose the format that suits your site rather than treating one layout as compulsory.
At the end of each month, note the most useful crop, the hardest maintenance task and one change you would make. Perhaps the watering route needs improvement, fewer lettuces would avoid a glut or a shadier area suits a different crop. Expand only after those lessons are clear. A successful first vegetable garden gives you usable produce and an understanding of your growing conditions. That is a strong foundation for the next season, even when the original planting list becomes shorter.
Keep a simple equipment box
Store labels, a pencil, string and the hand tools you regularly use together in a dry accessible place. Check sharp edges and handles before working, and clean tools after dealing with suspect diseased material. A consistent storage spot reduces the friction of short maintenance visits. Keep products in their original labelled packaging, secured appropriately, and do not decant garden chemicals into food or drink containers. Organisation supports safe work and makes a small plot easier to look after.